A Comprehensive Rainwater Management Plan ™, also known as a “CRiMP ™” is a set of documents created by a licensed Architect that details how to manage and redirect the rainwater falling on a home or building(s) and the surrounding land, to result in the least amount of rainwater being deposited at or immediately around the home or building(s).
The HOME ARCHITECTS ® invented the CRiMP ™ process in response to the many problems they have seen caused by others during the construction of houses and buildings where all aspects of a CRiMP ™where not followed, in an effort to cast light on a process that should be followed to help people have drier, cleaner, safer and healthier houses. This online article describes what a CRiMP ™ is and its major features and how it helps houses and buildings be better places in which to live and work.
Why are we concerned about rainwater around a house or building? Because rainwater is responsible for a great deal of the damage done to homes and buildings, all over the world.
What damage?
A. ROTTING OF WOOD, which is the primary construction material used in homes around the planet, especially throughout the USA.
B. WATER INTRUSION through foundation walls and into and under homes and buildings, which is responsible for the GROWTH OF ORGANIC SUBSTANCES, like mold, mildew and other substances that can be toxic or otherwise injurious to humans (who have COPD, asthma and other conditions) (this is partly responsible for Legionnaire’s Disease), in addition to the aforementioned rot, as well as creating a nurturing environment for WDI (Wood Destroying Insects), snakes, rats, mice and other pests that you do not want living in and under your home.
C. EROSION OF SOIL near to the house walls, which means that the soil particles around and under the foundation wall footings can be washed away, leaving air pockets under the footings, which can result in structural collapse of areas or movement of the entire structure.
CRiMP ™ : Comprehensive Rainwater Management Plan ™
So what are the primary elements of a CRiMP? A Comprehensive Rainwater Management Plan ™ starts at the beginning, which in this case, is the top, which is where the rainwater strikes the surface of your roofs and grounds.

Click the image above to see the Architect Contact Us form.
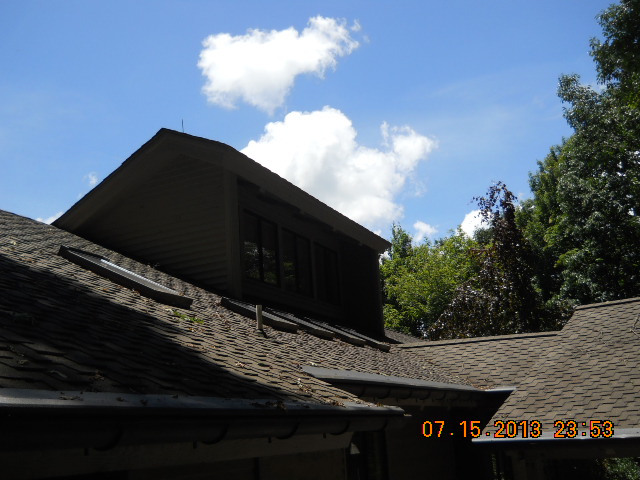
1. ROOF: in CRiMP-based thinking, an Architect designs the roof so that the rainwater is simply and directly conducted down and into perimeter gutters. Your roofs should always be at or higher than a 4 in 12 roof pitch (if using conventional roof shingles), unless you have a special waterproof underlayment or are using more exotic roofing systems. Most sensible Architects will plan on about a 2′ wide roof overhang, so that the roof protects the walls and windows below them. You can reduce this to nothing, however, the less roof overhang you have, the more you test the water-shedding ability of your walls, doors and windows. Let’s realize that we are not building a submarine here, but rather a house or other building. You will have less problems with your walls, windows, doors and foundation walls if you design the roof to overhang them substantially. And where you have lots of tall windows and walls, you might want to have the roof cover those areas with covered porches, which will protect them even more. It is hard to go wrong providing more, rather then less roof overhang depth. And the more steeply you slope roofs, generally the less leaking problems you should have, up to a point. Once you get over a 12 in 12 pitch, you exceed the ability of normal roofers to be able to safely install and repair your roof without substantially increasing the danger that they could fall off your roof and kill themselves.

2. GUTTERS: Let’s look now at the gutters.
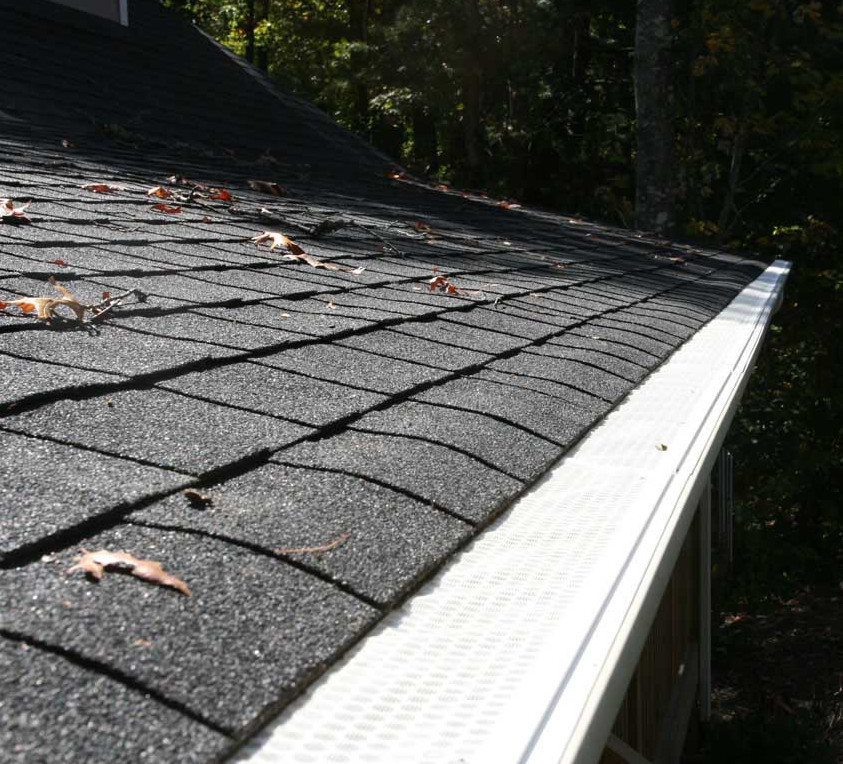
GUTTER GUARDS: There should be a gutter guard system specified and detailed that FILTERS the flow of water and other materials from the roof to only allow the water to enter the gutters. What else could there be flowing down and toward your gutters? Pine needles, leaves, small twigs and branches, flaking moss and bark from trees are all items that the HOME ARCHITECTS ® have seen clogging people’s gutters during their inspections of a variety of roofs. And when you have a matrix of debris in the gutters, that debris ends up clogging the DS (DownSpouts) and then there is so much debris packed in there that dirt particles begin to collect, which is the beginning of the end of the functionality of the gutters and DS. Better to have an effective gutter guard system. Beware of gutter “helmet” systems. The HOME ARCHITECTS ® report seeing heavy rainfall OVERSHOOTING gutters with this type of system, which means that most of the water may be simply falling over the edge of the gutters and drilling into the ground around your house, causing the aforementioned water intrusion problems.
There are simpler and effective options, such as a gutter guard type that has holes in its surface (about 1/4″ diameter) plus a fabric filter screen to keep out smaller debris particles, while admitting the water. These are less expensive and appear to be more effective. Their outer edge locks on to standard residential seamless gutters, and the inner edge tucks under the roof shingle edge. Here is a link featuring the actual installation of this simple type of system, personally by the Architect, himself: Installing Gutter Guards . This particular Architect admits to being all thumbs regarding construction work, which is why he so highly prizes the work of good, competent construction Contractors.
You need to keep this simple. This architectural firm has seen some instances where more complex systems have actually drilled screws INTO the top surface of the roof shingles to hold themselves in place and the defeats the whole purpose of the system: you do not want to go poking holes into the actual roof! Simpler is usually better, when it comes to roofs and gutters and gutter guard systems.
GUTTERS: The gutters themselves function very well as seamless aluminum with a factory finish: usually an economical enamel. We like SEAMLESS gutters, because, as the term implies, you can have them custom-made on your building site by the gutter installers, in lengths up to whatever the length is of the coil stock roll that the installer brings on their truck. We have heard that up to 210′ may be possible, although most installers will probably limit a single run to about 50′ as being the maximum length that a single person can comfortably shape. The main point is: when there are no seams, there can be no leaks in the gutters, which is a good thing. You want to control the water completely.
You may or may not eventually end up repainting the gutters in 10 to 20 years, depending on your climate, but the seamless aluminum gutter material itself may very well last the lifetime of your home. You can also obtain them in a variety of colors, including a dark brown, which comes very close to looking like the shade of a weathered copper in many climates (contrary to popular opinion, copper does not always turn a verdigris green). Personally, as Architects, we find that selecting a gutter factory paint color as close as possible to your selected fascia paint/stain color serves to blend the guttering into the overall architectural color scheme. About the largest reasonable gutter size will probably be about 6″ in width. Much more than this (if you could find portable shaping tools to make them in the field) and the prefabricated gutter guards won’t fit, so don’t get too frisky in trying to provide too large of gutters. If you have large roofs that you feel need additional water removal capabilities, the secret may be in the number of DS (see below). Stick with standard components, whenever possible, otherwise your costs will soar.
3. DOWNSPOUTS (DS): some people might feel that DS are really a part of the roofing system and we would not disagree. But, we felt that due to some connecting components, we would separate this in this discussion. Downspouts (DS) can be anyone of a number of various materials including round copper, galvanized steel, but we tend to prefer good old rectangular aluminum, because most American households and builders use seamless aluminum gutters and you are better off keeping potentially electrolytically dissimilar materials to a minimum. In other words: keep the material the same, whenever possible, or they could corrode each other. So: if you have aluminum gutters, it is best to have aluminum DS. And depending on your home or building’s color scheme, your DS may want to be a matching factory paint finish or a contrast. If you want the DS to appear to vanish, rather than becoming an accent, try to find a DS factory paint color that comes as close to matching your selected house wall paint as possible, in the location of the DS. Once again, unless you are trying to highlight the DS in the scheme, you may be more pleased with the result if you attempt to have them blend into the house coloring behind them, even though that happens to be a different color than the guttering. There are no “color police” that mandate that your gutters and DS have to be the same color. Do what is most pleasing for your particular situation. So: once you have the color in mind, your Architect will help you by selecting a compatible gutter section. If you went with a rectangular seamless aluminum gutter, it is most effective to use a rectangular aluminum DS. The size of the gutter will determine the size of the DS. So, if you have the largest standard gutter width of about 6″, the standard DS size will probably be 3″x 4″. This is because the bottom portion of the gutter will be about 4″ wide. So, the 3″ width of the gutter will be connected at the 4″ gutter bottom width, to allow for some minor tolerance in dimensions, although this can vary. The DS will immediately turn under the gutters and return to the closest available vertical surface: usually a wall or post. Then the DS will proceed down the vertical supporting surface and should stop about 6″ to 8″ above the finish ground level. Any metal can corrode underground, so don’t touch it.
Before we move on to other matters, let’s talk briefly about the NUMBER of gutters and the LOCATION of gutters. Do not skimp on their placement. Do Not locate only one DS at the end of a long run of gutter. What happens in this circumstance s that rainwater falling on the roof can and will completely fill the gutter if the distance to the DS exceeds the gutter’s ability to conduct the water to the DS before the gutter overflows and allows the rainwater to splash down around your house or building. This is one of the main situations a CRiMP (Comprehensive Rainwater Management Plan) is trying to avoid! We see this ALL the time, on EVERY house we inspect. For gosh sakes, spend a few more measly bucks and install a DS at the end of every section of guttering, unless the gutter is under 6′ in length. We have seen 40’+ lengths of 6″ wide guttering on multi-million dollar houses with only one little 3″x 4″ DS trying to dispose of all the water. There is no way that one small DS can possibly deal with all the water. Which means: much of the water you might think is being drained away from your house is actually dumping all around it, creating all the problems listed above. So: use MORE DownSpouts (DS), not less. Perhaps 1 DS for every 12′ of gutter run or thereabouts.

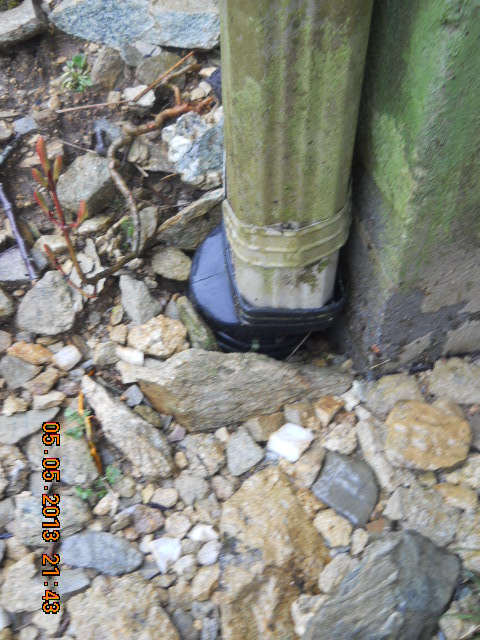
4. UG (UnderGround) Drainage Piping System: Coming up from the ground should be an UG drainage pipe that meets the DS. However, the UG piping industry has nifty couplings specifically designed to just such a joint. Use them. Do not cheap out and try to cram the DS into the round UG drainage pipe. This architectural and inspection firms have seen some people using cloth-based duct tape wrapped around these joints, which fail within a few months, allowing the splashing water to saturate the ground there, defeating the whole purposed of trying to control the water around the house or building, plus that looks terrible, and reduces your property value, making potential buyer believe that you are not properly maintaining your house and are resorting to slipshod materials and techniques. Do it right. Do it once. Then you are done. These UG pipes and fittings are very economical and are typically available from just about any builder’s supply house. The material is a corrugated black plastic, specifically intended for UG use. The actual OD (Outer Dimension) is about 4-1/4″, although any supply house will call this a “nominal” 4″ diameter round UG drainage pipe. It comes in 100′ long rolls. When the DS are purchased and installed, the Contractor should obtain a minimum of 4 extra screws with the same finish as the DS from the DS and gutter installer/supplier. This is so he/she will have the proper fasteners to use to connect the black plastic UG pipe couplings to the DS ends. Do NOT use ordinary steel or exposed pot metal screws or you they will immediately start corroding and corrode the DS along with them. Do it correctly and you will be done with this for just about the life of your house. Do not cut little corners or it will come back and bite you later. The couplings are typically made to connect a standard 3″x4″ DS end to a 4″ round UG corrugated black plastic drainage pipe. So: it is good to stick with standard components: everything works: everything connects perfectly.
So what now? Use only ONE UG drainage pipe for every single DS. Do Not interconnect them UG, otherwise, you may very likely be dumping too much water into these rather small (4″ diameter) UG pipes, and defeating the whole purpose and effort you have gone to, thus far. Okay: got that? One UG drain pipe for EACH downspout. Now: Take these UG drainage pipes, ONLY serving one DS each and Not connecting to anything else, and run them DOWNHILL from the house, at least 20′ down and away from any structures, including all decks, porches and post and wall footing and down and away from septic fields. Down and into a woods is a great dumping zone. The trees will love it and your house and immediate ground will be high and dry. Special note: NEVER interconnect UG DS drainage piping with foundation wall drainage piping. You may very likely end up pumping water along your foundation walls, and defeating the purposed of everything you are trying to avoid, and for what? All to save a few lousy pennies of UG drainage piping? UG drain pipe rolls are very economical. Even downright cheap. Don’t skimp on this. Get rid of the water for each and everything by itself without intermingling.
Run the UG drainage pipes out to daylight, by gravity, running downhill. Once again: at least 20′ down and away from your house and related footings and other elements that could be damaged from all that water.
You may want to have some medium-sized flat rocks placed down hill and underneath the outpouring from the exposed ends of the UG drainpipes, to help control erosion.
Okay, that takes care of the roof, is our CRiMP ™ now done? No. What about all that ground area around your house? There’s a lot of surface area. What happens to all that water? Let’s talk about that:
5. SURFACE WATER RUNOFF FROM THE GROUND: The number one cardinal rule: slope all driveways, walks, patios and ground DOWN & AWAY from your house/building(s). Do not get cute with planters and other features and think that “It’ll be okay.” No it won’t. We just inspected a very nice, expensive large house a few days ago and it has a number of planters located around it, which have been there for about 30 years. In every single location where there is a planter or ground higher than the elevation of the interior floor level, water is forcing its way through the concrete block and concrete and saturating the walls to 99.9% (per our General Tool Moisture Meter), indicating that they are entirely filled with water. The final grade line around any house should be from 6″ to 12″ below the level of the floor inside and/or the level of the nearest wood framing/wood materials (such as siding). We cannot emphasize enough: keep the ground lower than the interior walls and floor levels in the house. If you are going to do a Basement, then for gosh sake, engage an Architect to design your house and to specify and detail a proper wall waterproofing and drainage system to keep hydrostatic pressure from saturating your wall. You do Not want water to enter your walls and leak on your floor or to grow mold in your crawlspaces, creating the horrible stink, when you walk into some people’s basement houses. Those people will never sell those houses. People’s noses warn them of toxic circumstances and they will leave. Don’t think you’ll ever need to sell your house? Really? Think about it. On average, most households sell their house about every 7 years.
There is a lot of detail involved with surface water runoff and we just don’t have the space in this one article to cover them all. See: www.HomeArchitects.com for more information about residential Architects and proper design procedures.
Think we are done now? No we are not. What is left? How about the UG (UnderGround) drainage and waterproofing along your foundation walls?
6. FOUNDATION WALL WATERPROOFING & DRAINAGE: Do you really think that NO rainwater will reach your foundation walls, especially those portions of them that are lower than surrounding ground levels? Even if your Architect and Contractor did a great job with the roof, downspouts, gutters, underground drainpiping and surface water runoff, water can still attack your foundation walls.
How is this possible? Because water can travel underground. Especially if you are in an area where the geology has varying degrees of density of earth and rock. So, once water gets underground, it can flow underground in whatever direction it wants to go, usually guided by gravity and path of least resistance as far as lower density. This is another reminder to to do everything possible to control rainwater everywhere possible. Because some will still get to your walls. Make sure it is a minimal amount.
So how do we waterproofing UG (UnderGround) walls and provide underground wall hydrostatic breaks and protect the waterproofing and use superior waterproofing and drain water away from the bottom of the foundation walls and from the bottom of the footing? This typically requires several systems acting together. Rather that repeat information that has been discussed before, please see this link if you are interested in more information about this subject: Foundation Wall Waterproofing & Drainage . Suffice it to say here that the Exterior of the foundation walls is where the “rubber meets the road.” Or where the water hits the main barrier into your house. You need to have a high-quality waterproof barrier that will be durable for decades, not the cheap asphalt that most houses receive (if anything). This is where you definitely do NOT want to scrimp; it will be the source of many other ills for the life of the house, if you do not have this properly detailed, specified and installed. This is your main shield against exterior water. Engage an Architect to detail this correctly for you and also hire him or her to watch the Contractor install it, making sure it is correctly installed. Also, as part of the CRiMP ™, your Architect will no doubt include in his/her specifications for your Contractor to carefully walk and crawl around your entire house or building and find, remove, plug and waterproof any penetrations into your foundation walls by means of conduits, piping, old crawlspace vents (that should be removed and plugged) and other penetrations.

7. CRAWLSPACE MOISTURE MANAGEMENT: With only one exception, every house inspected by this company has has improper and inadequate moisture management in the crawlspaces.
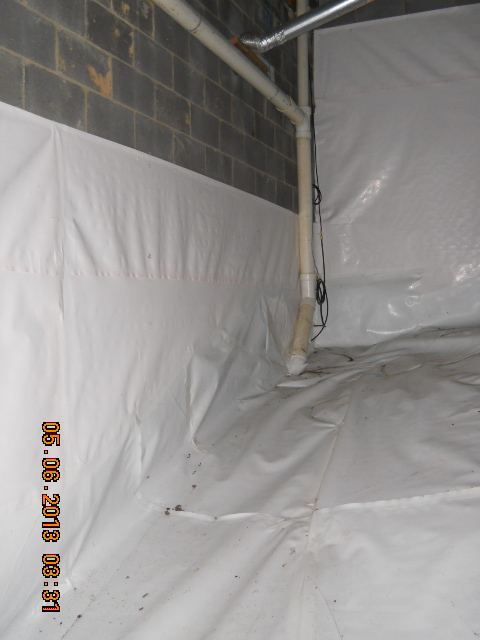
Let’s start with the Vapor Barrier: the earth under your house and building is supposed to functionally and per code, have ALL of the dirt covered with a plastic barrier. Most of these sheets are torn, moved, never installed or not installed correctly, so as to NOT cover 100% of the earth under a crawlspace, which is WRONG. Water flows under and over the earth in most crawlspaces, which is WRONG. It is penny-wise and pound-foolish to not have them done properly. Gallons of water vapor can daily enter your house from the crawlspace, along with all the creepy-crawlies that the water attracts: rats, mice, cockroaches, ants, termites, snakes, even raccoons! We’ve seen them all down there, under your house. Make you feel safe and clean and sound? Feel concerned? You should be! If you smell a moldy, musty odor, guess what? It is mold! It is WRONG! Engage an Architect to create a CRiMP ™ (Comprehensive Rainwater Management Plan ™) to correct the situation as soon as possible. Let’s get back to the Crawlspace Vapor Barrier. Minimum Code will NOT adequately protect you. Even if correctly installed, the minimum requirements just aren’t enough to properly contain and keep out all the water vapor and water that can get into your house. Experienced Architects will likely specify an Encapsulation System, which will entirely cover the dirt floor and the foundation wall interiors with a thick, white vinyl that is completely taped together and sealed to the foundation walls to keep ALL (99.9%) of the moisture from the earth and walls out of the Crawlspace, if properly installed.
Dehumidification: next: you need to continuously and automatically dehumidify the Crawlspace, and have this condensate hard-piped to the outside.
See this online article to read more about Crawlspace Encapsulation Systems and Crawlspace Moisture Management: Encapsulated Crawlspace . After having your Architect detail and specify your Crawlspace Moisture Management portion of your CRiMP (Comprehensive Rainwater Management Plan), you will start to appreciate how nice, dry and sweet-smelling your house have become. And the Crawlspace is no longer the nasty, creepy dungeon it used to be. The white surface reflect light and you can see everything and it is all clean and dry.
SUMMARY
Finally we are about there. This subject could be extended, particularly regarding techniques involved with Surface Water Runoff, but this online article has already become too long.
If you need help and want a CRiMP ™ analysis created for your house or building, contact the HOME ARCHITECTS ® at: 828-269-9046 or e-mail: Rand@HomeArchitects.com
The primary items of a CRiMP ™ (Comprehensive Rainwater Management Plan ™) are:
1. Roof planning.
2. Guttering layout (includes gutter protection system).
3. DownSpout layout.
4. UG (UnderGround) Drainage Piping.
5. Surface Water Runoff from the Ground design/corrections.
6. Foundation wall Waterproofing & Drainage.
7. Crawlspace Moisture Management .
There is a Zen saying that: EVERYTHING IS CONNECTED. So it is with a CRiMP ™. Fixing any one thing will not necessarily solve the overall problem(s) being encountered. It is important to address ALL aspects of a CRiMP ™ (Comprehensive Rainwater Management Plan ™) in order to completely solve rainwater intrusion into your house or building. And the best way to accomplish that is by engaging an Architect familiar with performing a CRiMP analysis.
